
.thumb.jpg.7e8ff401dde48f6d12a5cda71c99ffe6.jpg)
Tea lights are best known and loved for their small size allowing them to easily fit into a variety of social occasions. They are enduring because they may produce a surprising amount of soft ambient light for their diminutive size. They can make a room feel warm by adding light, ambiance, and even soft fragrance to any room. They are easy to make so you can be enjoying your own handmade tea lights any time.
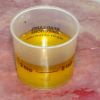
Tea lights are a container type candle and many prefer to use a container wax. But they also work well with wax blends for tarts, votives and pillars. Additionally, just about any type wax; soy, paraffin, palm, or beeswax may be used for making tea lights. For this demonstration I am using a paraffin pillar/votive wax. I prefer a harder wax that shrinks slightly once its cooled. This allows the tea light candle to slip out of its container.
I tend to spill my wax and mess up my containers so I like the idea of slipping out the tea light candle and putting it into a fresh unspoiled container. So for this tutorial I will be using a pillar/votive wax. I re-use the old tea light containers for repouring new tea light candles. If you don’t like this extra step a container wax will work just fine.
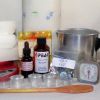
Step 1: Materials
For this tea light making project you will first need to gather the following materials:
8 oz Container Wax or Pillar/Votive Wax
.50 oz Fragrance Oil
12 Tea Light Molds
12 Tea Light Wicks (I’m using CD-3 wicks)
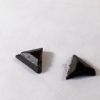
½ Red color chip or 1-4 drops liquid dye
Small Pouring Pot
Wooden Spoon
Heat Source (for melting wax)
Thermometer
Scale
Paper Towels
Step 2: Preparing and Heating Your Wax
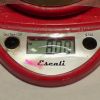
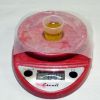
Always weigh your wax on a scale that gives you an accurate weight in pounds and ounces. I have an old Escali scale that weighs in pounds, ounces, and grams.
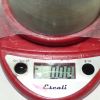
Weigh out 8 ounces of wax and place it in your pouring pot. For my heat source I am using an electric grill. Other methods of heating wax are a double boiler, presto pot, or a professional wax melter.
Using a thermometer, heat your wax to 185 degrees F. I am using a candy thermometer I purchased at a local department store in the kitchen supply section. This one happens to have an attachment that fits onto my pouring pot. Stir occasionally with your wooden spoon to heat the wax pieces and to distribute heat evenly.
Step 3. Adding Dye and Fragrance Oil
When your wax is fully melted and reaches 185 degrees F its time to add your fragrance and dye. I add my dye first. I am using ½ of a red dye chip I cut with a small paring knife. If you are using liquid dye you will add one drop at a time until you achieve the shade of dye you want.
Add the dye chip and stir it into the wax with your wooden spoon. Continue to stir until it dissolves completely.
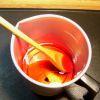
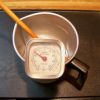
Next weigh your fragrance oil. I am using Red Clove fragrance oil from Peaks.
I use a small plastic container to weigh my fragrance in. Place the container on your scale. Use the ‘tare’ feature to zero out the weight of the container. Weigh out .5 oz (½ oz) of fragrance oil. Then add your fragrance to your wax and stir until its thoroughly blended in your wax. This may take 1-2 minutes of continuous stirring.

When you are finished adding your dye and fragrance take your pouring pot off your heat source. I like to place my pot on a hot pad holder so it won’t scorch my counter top. Let it cool a bit to about 165-170 degrees F.
Step 4. Wicking and Pouring Your Wax Into Your Mold
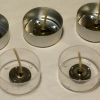
While your wax is cooling, lay out your tea light holders. Place a wick in the center of each container. I am using both plastic and metal containers so you can see how each type turns out. For my wax I am using CD 3 tea light wicks.
When your wax has cooled to about 165-170 degrees F its time to pour your tea lights. Carefully pour the wax into the tea light container until it reaches the top. Try not to over pour. I put down some paper on my counter top to catch any wax drips.
When you finished pouring you may want to check each wick to make sure its centered in the container. Adjust any wick if necessary. Do this now while the wax is still hot and liquid. Once its cooled the wicks will be set.
For this tea light project I used a little extra wax so you would have enough leftover for a repour. If you are using a pillar/votive blend then save your wax for a repour.
Step 5. Repour
Note: this step is optional. If your tea lights are level when cooled you won't need to do a repour. Since I am using a votive/pillar wax I need to top off to level the candles.
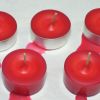
A repour is done when your initial wax pour has cooled and forms a concave indention in the center of your candle. A second wax pour (repour) is done to level it off. (See previous photo)
To do a repour heat the leftover wax to a temperature approximately 10 degrees hotter than your first heating. In this case you will be reheating your wax to 195 degrees F. When the wax is ready, pour enough to top off each candle.
Step 6. Wick Trimming and Cleanup
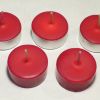
Allow your tea lights to cool completely. Trim each wick to 1/4" inch using a wick trimmer or a pair of toenail clippers will work just fine. Put them aside in a place they won’t be disturbed to allow them to harden and cure for 24-48 hours.
Clean up your area, making sure you have cleaned any spilled wax. I use paper towels for cleaning my counter top. I also use paper towels to clean the inside of my pouring pot while its still hot and the wax is still liquid enough to be absorbed by the paper towel.
And now its time to enjoy your beautiful tea light candles!
-
 3
3
-
 1
1


Recommended Comments
Join the conversation
You can post now and register later. If you have an account, sign in now to post with your account.