

Stain Glass Gel Candle Tutorial
Level Easy
Supply List
Gel wax at least 2 lb. Preferably 1 lb. of two different densities but not required.
Fragrance Oil "gel Safe" http://www.gelcandlemaking.com/section4.html
Mineral oil small bottle
Aluminum foil
3 colors of dye I use liquid but you can use blocks, not much is needed.
Glass Container
Wick.
If you have never worked will gel before please read
http://www.craftserver.com/page/articles.html/_/candle-making-faq-archive/gel-wax-r76
Gel Wax I use medium and high densities for this but you could easily use med. and low.
If you have any questions feel free to ask I will answer.
This is a candle that looks like an advanced tech but a beginner can do this with ease.
Step 1 prep.
Separate out 1 oz. of gel for each color you are going to use. If using 2 density use the higher density. I used 3 colors in this class.
Ad 1 oz. gel to your melting pot and get it started melting.
Step 2
While your first ounce is melting get you aluminum foil ready.
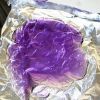
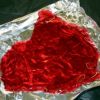
I make a flat boat out of it about 6" wide and 8" long. Shinny side up
Lay out about 20" of foil shinny side up to receive you cooled gel.
Step 3
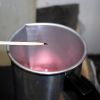
Keep eye on your gel as it melt it will melt quickly if using the top of your stove.
Add one of your dyes I just dip my stirring stick in to the dye so I do not get too much at a time.
Mix well.
Step 4
You are going to want to pour this hot
HP about 220
MP about 205
LP about 190
When you are up to temp pour in to your foil boat.
Step 5
Repeat the above steps for each color.
While you are waiting for the gel to heat and cool.
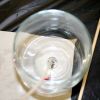
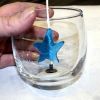
Clean and wick your container. Your container needs to be really clean. I wipe mine out with a little glass cleaner.
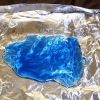
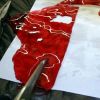
About the time you next batch of gel is ready you first batch should be ready to peel up. Peel it up and lay it on your foil sheet that you laid out.
Step 6
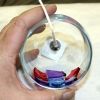
Get enough gel in the pot to fill your container and get it heating if you are using 2 densities use the lower one.
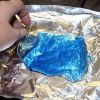
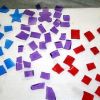
While that is heating and you are waiting for your last layer of gel to cool start cutting up the gel.
You want to keep you gel pieces no bigger than an inch
It should look something like this when your pieces are all cut up
Step 7
The mineral oil I asked you to have on hand has a duel purpose. One was to test your FO with the other is for this next step.
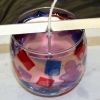
After all your colors are cut up you are going to start applying them to the inside of the container. Gel sticks really well to clean glass but if your pieces are a bit big rub a little mineral oil on them to get them to stick better.
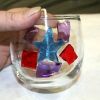
Just work your way around the container with the gel pieces. pic 12
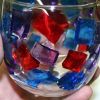
Do not let your gel pieces overlap if they do they will fall.
Step 8
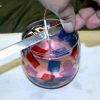
When you heating gel is ready mix in the FO.
You want to pour cool but not so cold it is cloppy, please pour slowly you do not want to disturb the gel stuck to the sides of you container.

Step 9
Last step I promise.
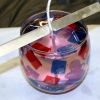
A few of the pieces that are left over lay gently on the top of the hot gel.
Let cool 24 hours and light it up
That is it.
You cannot get much easier and the creative possibility are endless.
I have apply the gel like that to a container and then over poured with regular wax I have cut out shapes just like you saw.
You can do a lot with gel and if you are only using gel applied to the glass and then over pour with regular wax you do not have to worry about gel safe FOs
-
 1
1


Recommended Comments
Join the conversation
You can post now and register later. If you have an account, sign in now to post with your account.