

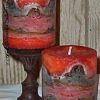
Wave candles by Scented
Rating: Intermediate to advanced
Supplies/Tools needed?
Wax (Enough to make at least a candle, preferably paraffin for pillars. May work with a para-soy pillar blend, but probably will not work with straight soy or veggie wax that are too soft or too brittle -- never used it so I don't know, but you’re welcome to try it and not blame me on the outcome lol)
Mold(s)
Wick(s) or wick pin(s)
Additives for wax (optional – this candle contains steric and UV)
Colorant (at least two, but feel free to experiment with more as more is fun!)
FO (optional)
Pouring pitcher or something similar
Teaspoon/Tablespoon or any spoon that will fit comfortably into your mold
Skewer/chop stick/dowel
Tilter (optional)
Heat gun
Setup: Wax melted, with additives and scent included.
Molds wicked or pinned and on a tilter if you want to use one (I typically do, but it isn't mandatory)
HINT: No set temperature or recommended temp to pour at. The cooler you pour the more rustic the appearance.
Process
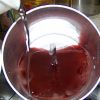
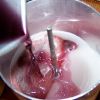
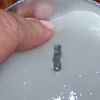
Step 1: (Assuming wax is melted, additives added, wax divided and colored and mold(s) prepped.) Pour one color of wax into a mold and let set up till it is pliable enough to push, but not break. The more you pour into your mold, the longer you’ll wait, but in 10-15 minutes the wax should be ready to push. In this picture, the 3x3.5 mold is angled on a tilter. I’m starting with white and have divided my wax into three pots, using two drops of coffee liquid dye and a couple of shavings off an apple cinnamon block in one pot, a few shavings of cherry (happens to come out a dark purplish color) in another and uncolored wax.

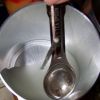
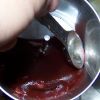
Step 1a: (Assuming you are rotating pots to keep wax liquid, which would be a good idea.) Once the wax is set up, take your spoon of choice (this measuring spoon is old and needs replaced, not dirty) and push it gently into your wax, taking care not to pull the wax away from the mold as you push. If you pull some away, just push it back against the mold, otherwise you run the risk of leaving a hole.
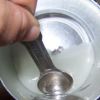
Step 1b: Pushing the wax, the deeper you push it, the more dramatic the effect. Push as much as you want and make sure to keep the back of your spoon clean, otherwise you’ll start to pull up wax. If you break the wax, just let it form a thicker skin and push it again.
A good test of when you’re near maximum push before breaking the skin is the wax will bead. It’s hard to see on the white, but in this picture, the skin did break and there is beading on the surface. Beading looks like sweating.
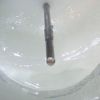
NOTE: When using a spoon to push wax, make sure you give steady pressure and push straight down, not at much of an angle, spoon against the mold.)
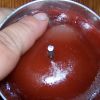
Step 2: Once you have made the initial waves, pour another color and let set up. In this picture, I’ve gone with the brown and apple cinnamon mix. I poured a thin layer, but pour your next layer as deep as you want.

Let set up.
And push again.
Step 3: Take your spoon and push into the wax once it has set up, making indentations in the wax. This is a picture of working too soon trying to press on the wax. If this happens, just let it set up for about 3-5 minutes and then push again.
Keep your spoon surface clean. IF you can fit your thumbs or fingers in the mold, you can use them in place of that spoon.
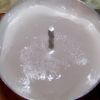
This is when it's set up again. I did take my heat gun to the top just to smooth it a little.
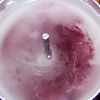
Step 4: Pour another layer of wax, let set up, and make indentions in the wax as you've done the previous layers. In this photo, I actually poured a thin amount of white, let set up for about 5 minutes and then poured more white into the mold to avoid too much bleeding from the color underneath.
Step 5: Keep pouring layers, allowing the wax to set up in pliable state, pushing down on the wax before you pour each layer.
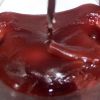
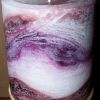
This is the color of the cherry
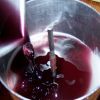
Note: As you get higher in the mold with your layers, you can do away with the spoon and use your thumb or fingers to start manipulating the wax, get more pressure on it and make bigger indentions. In this photo you can see the wax beading or sweating and at the bottom, the skin actually breaks a little. Using your forefinger, it’s easier to smooth your waves by applying a small amount of pressure while you rub over the wax. Sweating on top is pushing the wax close to the breaking point.
NOTE: The deeper you push the more pronounced the waves will be in the candle.
If wax spits out on a layer, let it set up a little more and push again. If you see air bubbles, zap them with a heat gun.
Step 6: Another layer poured. For the FOH Cinnamon Apple Berry candles that these pictures came from, this is the third layer from the end. Once it set up, I used my fingers to really press down on the sides.
In this photo, I’ve made the waves.
With my fingers
I pour a shallow layer of another color, let set up and press wax down. (see the bulge?) Leave the bulge alone for now.
NOTE: When I'm pushing with my fingers, I am not against the mold per se. I push into the mold sides and then down, roll the finger to smooth it in place and look for any separation from the mold. If it's there, I close it up by pushing it back against the mold.
This is near the end of the candle. (Where we bust the bulge)
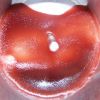
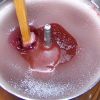
Step 7: Add another layer of color, and then poke holes in the bulge to relieve the pressure in the mound that has formed. Wax will come out, so do it gently or it will squirt. I generally apply four holes around the wick pin. I use my heat gun on any air bubbles that surface. When I’m poking these holes, which are not really relief holes, I do go down into the candle till I meet resistance of harder wax.
I allow the layer to set up, push on the sides some and make the last pour. On the last pour, I will poke the relief holes, going down into the candle till I run into resistance and then I poke a little harder, but not all the way to the bottom of the mold. Running that deep into the candle helps to lock a layer to another layer as well as relieve pressure that can cause the candle to pull in on the sides.
Step 8: Keep your relief holes open till you're ready to make your repour, let cool, unmold.


Recommended Comments
Join the conversation
You can post now and register later. If you have an account, sign in now to post with your account.