

Tilted Layered Rustics by judyvega
Rating: intermediate
Supplies/Tools needed:
- Wax (Enough to make at least one candle, preferably paraffin for pillars. May work with a para-soy pillar blend, but I don't use it so I don't know for sure.
- Mold(s)
- Wick(s) or wick pin(s)
- Additives for wax (optional – this candle contains steric and UV)
- Colorant (at least two, but feel free to experiment with more as more is fun!)
- FO (optional)
- Pouring pitcher or something similar
- Skewer/chop stick/dowel
- Tilter (optional)
- Heat gun
- we'll be pouring at 150-155, so make sure your wax isn't too hot.
Directions:
As a side note, I do not use pour pots, I use small two ounce (I believe) ladles. That way I can control the amount of wax going into each layer.
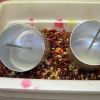
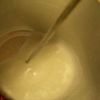
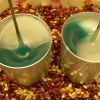
Step 1: (Assuming wax is melted, additives added, wax divided and colored and mold(s) prepped.) Pour one color of wax, heated to 150, into a tilted mold. I pour down the wick pin so that it doesn’t go down the side of the mold for the most part. The more you pour into your mold, the longer you’ll wait, but in 15 minutes or so, we should be ready to pour our next layer. In this picture, the 3x3.5 mold is angled in a small plastic container w/beans. I have a much larger, shallow box that I use for large batches. I’m starting with white and have divided my wax into three pots, using blue and green dye in two pots, but different amounts of each color in both pots, and leaving the third uncolored. My goal is to have two different colors of teal, one more green, one more blue, and white. The first layer I am pouring is white.
I don’t pour across the entire bottom of the mold, as I like to have two distinct colors on the top of the candle. You’ll be able to see what I mean in the pic.
I know that a lot of people who do rustics swirl the wax around the mold to give it an even more rustic appearance, but I don’t. It’s really up to you if you’d like to or not. What I actually do is just tip my mold slightly from side to side so that there is just a little bit of an edge on the sides of the liquid wax (I hope that makes sense).
I pour each layer between 150-155, so don’t let your wax get too hot as you’re waiting for your next pour.
Step 2: Ok, you will know you’re ready for your second layer when the wax starts to get shiny. It starts out w/a matte finish, then gets more shiny as it hardens. I take the end of a skewer (not the pointy end) and push it on the surface of the wax to see if it’s getting hard enough. My wax really does not roll beneath the surface before I do my next pour. I let it get pretty hard. Hopefully in the pic you can see how the surface is pretty shiny (I tried to show the marks from where I tapped it w/the skewer, but not sure if you’ll be able to make them out or not. The wax is even starting to mottle at this point. At this point I pour my second layer, one of the teal colors, directly opposite of the first. (GRAB photos, both on
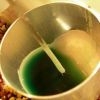
AFTER WAX FROM SECOND POUR SETS UP
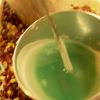
Step 3: For the third layer, I do my pour somewhat over the second pour (over the blue) – I am doing my third pour w/the clear wax. The reason I pour it mostly over the blue, as opposed to doing it in say the third “corner” if you will, is because you want visual interest on all sides of the candle. If I was to just pour it in that third side, I would have two blotches of white w/no break in between – makes it kind of blah.
Let set up.
Step 4: Pour another layer of wax, for me it’s the second teal color, at an angle, let set up.

Step 5: I then pour another layer of white. After that layer is set up, stand mold upright for your final layer. Pour it, let it set up, poke your relief holes as it cools, do your repour, unmold.


Recommended Comments
Join the conversation
You can post now and register later. If you have an account, sign in now to post with your account.