

Marbling technique
Skill level = Intermediate.
*These candles can be made by a beginner, but I have found in teaching this technique that the more comfortable you are with the way your wax behaves, the easier it is to achieve the desired outcome.
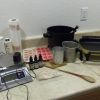
Equipment and supplies needed:
Pillar wax – this can be any type of pillar wax – either a blend, or straight paraffin.
- I have used IGI4625, IGI1343A and MP140 Pre-production blend wax – both with very similar results.
*Note – I have never made these using a soy blend or straight soy so I cannot speak to the outcome, but I see no reason why it wouldn’t work with soy. As long as it’s a pillar wax – and can be molded.
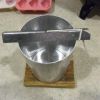
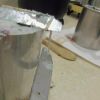
Mold – any metal pillar mold will work – I do not recommend plastic or polycarbonate molds due to the heating of the outside mold step performed later in the process (see …)
Wick - however you would normally wick the mold you are using, and whatever wick size works for the size candle you are making with the type of wax you are using is the wick you want to use.
Scent - optional
Candle Dye - I find that liquid candle dyes work much better when doing this technique due to the fluid nature of the liquids vs. blocks that you have to melt. The blocks don’t disperse nearly as easily.
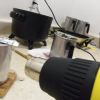
Melt pot - this can be a double boiler or a presto pot. Whatever you are familiar with using to melt your wax.
Pour pot - this is whatever you normally use to pour your wax into your mold with. If you use your presto pot for this, it might be easier to get a separate pour pot.
Scale - to weigh out the wax you need and also scent if you use it.
Additives - this is optional - only use additives if you normally use additives for your particular pillar wax you have chosen to use.
*Note - I will be using the MP140 Pre-production wax for this tutorial which is a paraffin blend that requires no additives, so I will skip this part. If you are using additives, add them whenever you normally would for your pillars.
Knife - just a little butter knife. This is for scraping the sides of the pour pot, leveling out the top of the mold (somewhat) and banging on the outside of the mold once it’s pour to help decrease air-pockets.
Heat Gun - For step 9, and it’s handy for cleanup
Griddle or leveler - to level candle while still in mold
Paper towels - for clean-up
Embed or tart mold(s) - optional
Step 1:
Weigh out your wax. Weigh out enough to fill your mold, plus a little extra for the re-pour. This will insure you don’t get sinkholes.
Add to your melt pot and melt wax
Melt wax until just liquid - (Or however you are comfortable with. The first part of this technique is exactly like making a normal pillar - I personally don’t take temps, ever, but for this particular technique temps are not necessary, unless you are stickler about when you add your scent - I know some scents require a higher temp. In that case melt as normal and add scent. I suggest to only melt until fully liquid, but not hot - the hotter your wax, the longer it will take to get to the slushy stage to pour into the mold)
Step 2:
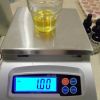
As your wax is melting, weigh out your scent and set aside. Also prep your mold with wick.
Step 3:
Determine your colors and get them ready. I use Peaks liquid candle dyes. For this particular candle I am using the following colors - Hunter Green, Golden Honey/Vanilla, & Purple.
Step 4:
Once your wax is melted pour out of melt pot into the pour pot. Add scent as you normally would, but do not color yet. Make sure scent is fully incorporated. (at the lower temp I melt my wax at for this technique it takes a bit more stirring)
Let sit for a while - anywhere from 5-15 minutes, until there is a thin build up on the sides of the pour pot.

Step 5:
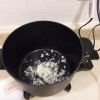
Once the wax starts to cool and clings to the sides, gently start scraping the scraps off the side of the pot and stir - it may turn to full liquid again - just keep waiting, scraping, stirring, waiting, scraping, stirring until your wax finally gets to be very slushy, but not too liquid. This is where it starts to get tricky. You want it to be slushy but still pourable, but not so liquid that your colors run and become solid.
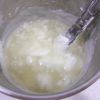
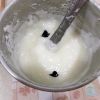
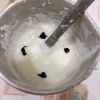
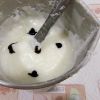
Step 6:
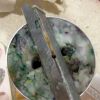
When you have hit your sweet spot of slushiness (with practice you will know when this is - also the pics hopefully will help you determine when that is) it’s time to use your colors.
If using only 1 color you will put 4 drops of color in sort of an X pattern (see pic)- if 2 colors 2 drops of each color opposite of each other.
*Since I am using 3 colors, I am putting 2 drops of green opposite each other, 2 drops of purple opposite of each other and 1 drop of the honey/vanilla right in the middle.
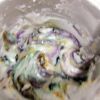
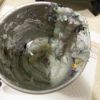
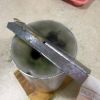
Step 7:
Another tricky part - now you want to take your knife and very gently but firmly swirl your colors into your was. Don’t stir too much to where you color all of your wax, but enough that you also get the color towards the bottom of the pot. For this I have no pic of how I do it, but I sort of stir up and down as well as in a circular motion. Total turns with the knife = no more than 4. (Otherwise you lose your marbling effect and it just becomes a solid colored pillar) -(Sorry the pic is blurry)
Step 8:
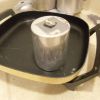
At this point your wax should look marbled and like the pic in step 7. Now you will pour that into your waiting prepared mold. Try to get the mold as full as possible - even pushing with your hands if necessary. (but be careful - even though it’s not molten, it is still hot)
Once wax is poured in your mold, bang your mold on your work surface a couple of times (wax may splash out, this is where the goggles come in handy) then take your knife and bang it against the mold. Not hard enough to dent your mold or anything, but enough that it will clear any air bubbles.
Step 9:
We are almost done! At this point, you want to take your heat gun and gently heat the outside of your mold. This will accomplish 2 things - melt any wax into any bubble gaps, and also help make the outside of the candle a bit more shiny when you un-mold.
Step 10:
Set aside and let cool - checking in about 10-20 minutes to poke relief holes.
You will most likely have a lot of wax left in your pour pot - remelt this remaining wax and use it for your re-pour.
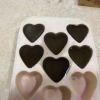
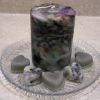
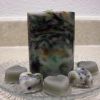
Once the re-pour is done, if you still have wax left over (I always do) you can pour it into an embed mold or tart molds to make wax melts.
(after the re-pour has cooled a bit, and you would like to speed the cooling, you can place the filled mold into the refrigerator to accelerate the cooling process - this will also help with the gloss/shine of the finished candle)
Step 12:
Once cool, trim excess wick off top of poured mold, but don’t un-mold yet. - This part will most likely be bumpy and uneven.
Warm a griddle (or whatever you normally use to level your candles) and level the candle.
Once that is done, turn mold over, undo wick and un-mold candle.
Step 13:
CONGRATULATIONS -
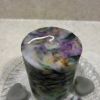
At this point you should have a beautiful marbled finished candle. The only step left now is to take a pic, post it, and enjoy the accolades of your beautiful creation!
-
 7
7
-
 1
1


Recommended Comments
Join the conversation
You can post now and register later. If you have an account, sign in now to post with your account.