

Gel Apple Pie Tutorial
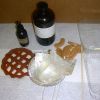
Items needed:
Wicks
Wax Embeds (slices of apple)
Pie Crust (wax)
Gel wax
Dye
Fragrance oil/FO (gel safe if you need to know if your FOs is gel safe click here)
5" Pie Pan
Clamshell (optional)
Scissors for cutting gel and wicks
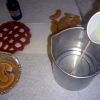
Melting pot
Thermometer
Scales
Stirring stick
Tooth pick for adding dye (optional I use pointy end of my stirring stick stick)
Step 1: Start melting your gel wax. (If you have never worked with gel before please read Click Here.) While the gel wax is melting, cut and place wicks.
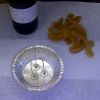
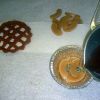
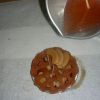
Step 2: Next, arrange the first layer of embeds and measure out the gel safe FO (fragrance oil).
Step 4: When gel is melted, (temp is about 200 to 210) add the FO.
Give a couple of quick stirs to start the blending of gel and FO.
Step 5: Now add the dye, by putting a touch on the end of a toothpick and stirring it into the pot. Be careful, a little dye goes a long way.

Then mix well.
(I don't mind the bubbles here as I want my pie to look bubbly.)

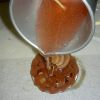
Step 6: Let the gel wax cool a bit until it starts to thicken up. Make sure you let it cool or it will melt the embeds. Then pour a thin layer of gel over the the embeds.
Step 7: Let the candle sit for 10 minutes or so to cool. Now you will need to warm the gel wax back up. When wax is reheated, fill pie tin ¾ of the way full. Let cool a bit 10 or so minutes is usually good.

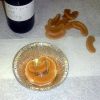
Step 8: Then place the rest of the embeds on top.
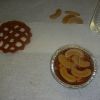
At this time place the crust on the candle. Place any decorations you would like. (Optional)
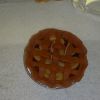
Step 9: With remaining gel, (you may have to reheat depending on how quickly you were able to do step 8) pour over the pie. Start close to the decorations so the wax seeps under, then pour over the decoration to anchor them to the pie. The gel wax should seep down in the crust to fill up any air pockets so pour slowly.
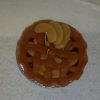
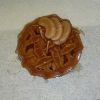
Completed Pie Candle
When all wax is cool you can do clean up and touch ups, but that is pretty much it.
That is a basic lattice pie. If you are doing an open faced pie, your embed placements inside the pie is much more important. With this type of pie you just want the insides to look full.
Notes: As far as decoration, let your imaginations take you. I add dollops, other embeds, place slices all the way around the candle or fan out from the center, but it all up to you now.
How many wicks is up to you also.


Recommended Comments
There are no comments to display.
Join the conversation
You can post now and register later. If you have an account, sign in now to post with your account.