

Bath Bomb Tutorial
Level: Easy
By Monica of www.vanyulay.com
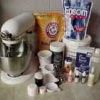
Recipe:
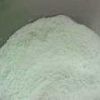
4 ½ Cups Baking Soda
½ Cup Powdered Milk of Choice
2 ½ Cups Citrus Acid
½ Cup Epson Salts
½ Cup Corn Starch
½ Cup Sodium Lauryl Sulfoacetate (Sulfate) - (Powdered)
2 0Z Oil of Choice (Light Oil- Olive, Grapeseed, Jojoba)
1.5 0Z Water
2 0Z Scent
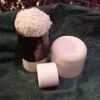
One of the main tools that everyone needs is a pressing tool. Does everyone have one? Mine is a handmade item. It is a deodorant small stick with cloth on the top. It looks silly but is wha makes the bombs the D " Bombs"
Ok, let’s go over a few fundamentals of making the bath bombs. I have researched on this board bath bomb making. Whew… Everyone is having problems with the bombs cracking. Cracking comes from the air bubbles. Air is our enemy in so many ways. Bakers compact their muffins by tapping in on the counter to release any air pockets. As also do the concrete layers stab their foundation with a pole and tap it with a board. It is the same here. If your bath bombs are not compact tightly enough the air bubbles will crack them. Another reason for cracking is you let the product dry out, too long to mold them.
You have to be quick. If you are a newbie… Try cutting the recipe in half. So you can see and feel the procedure.
Knowing the ingredients and why they work together would help you make better bath bombs.
1. Baking soda and the citrus acid are what make the bath bombs fizz.
2. Epson Salts stabilize and make the fizz more productive. As well as a skin detoxifier.
3. Cornstarch keeps the ingredients dry and it is a glue like substance.
4. Oils. Now oils are emulsifiers in this projects. Oils also are skin friendly and make the bath comforting. Some oils also kill the bubbles because they are high in Oleic Acid. Which are Emu, Oil, Mango, and such. Other oils like Grapeseed, Sunflower are lighter oils. They are higher in more linoleic and will not kill the bubbles as bad.
5. Sodium Lauryl Sulfoacetate is a bubbling agent.
6. Milk – Is a detoxifier and is full of Lactic Acid.
The recipe that I have made for this thread is perfect in every way. If you want more fizz.. just use less cornstarch or milk. And add equal amounts to the Baking soda & Citric Acid. Try this recipe and then alter them next time for a different outcome. I like this recipe because it fizzes, and bubbles, then sooths with the oils... Perfect for fun and a skin loving bath!
Directions:
1. Gather your ingredients to make the bath fizzie bombs
2. In the mixing bowl, measure and add the sls first. Try not to fluff this ingredient. Pour slowly. You do not want to breathe this ingredient. If you haven’t done so yet. Grind up your Epson salts to a fine powder. Add the Baking Soda, Citrus Acid, Corn Starch, Epson Salts, and Powdered Milk in your mixer bowl.
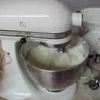
I am using the wire whip for the Kitchen Aid.
3. Now we will weigh out our wet ingredients. Use your scale and place your paper cup on the scale. Tare the scale so it zero’s out Weigh out your fragrance oils, water and oils. Make sure that your weights are exact on the oils and water. Add your colorant. I use about a ½ tbs of dye, but everyone’s colorant will be different. Make sure you right down how much you used to compare next time you make them. Stir all together to combine all ingredients well. Take a spoon and stir well.
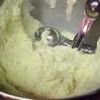
4. Now turn on your mixer with the whipping blade attached. Mix on low speed; slowly drizzle the wet ingredients into the dry mixture. You are going to mix this until it looks like parmesan cheese. Your mixture is going to look dry. Do not; do not add any more water, oil or fragrance.
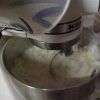
This is how it should look. Keep mixing it until it is crumbly.... Sandy looking
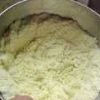
5. Now you can test it in your hand. It should look like perfect grains, still powdery. It should feel damp or cold, not wet. It will clump together when you squeeze your hand together. If you drop it into the bowl it should stay together. That is perfect. The recipe I provided is perfect, but if you are using another recipe you need to know what to look for.
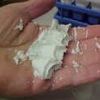
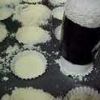
This is what the mixture looks like if it is too wet!!
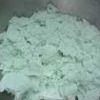
This is what it looks like to dry.
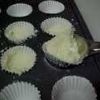
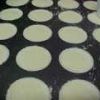
6. Ok, now the work comes into play. Grab your husband, father, children and anyone who wants to help. Place your mold on top of a cookie sheet. This stuff seems to travel well. I use cafeteria trays. But anything will work to catch the left over’s. Use a scoop of some sort and fill your cavities half way. Grab your pressing tool. Push, push, and push your ingredients into the cavity. I like to use a small round deodorant tube. As seen in the picture. The key to making these it to get them tightly packed. For the gal or guy that only weighs 98 pounds soaking wet, stand up and push your weight on these guys. Please don’t use your thumbs. It is not enough torch to compact the bath bombs. Keep adding product till the tops are smooth and hard. At this point you should not be able to push on the cavity and leave an indentation. If you do, you have not compacted it well enough.
The trick to these guys is to work fast. They dry out so fast.
Now they should look like this.
8. Set the Bath Fizzies on a surface to dry overnight. Cover with saran wrap. Or put in an air tight container.

Recipe for Regular Bath Fizzies Icing:
Ingredients:
2 TBS Meringue Powder
4 TBS Powdered sodium laurel sulfate (SLS)
1 Cup Corn Starch
1 Cup Powdered milk
1 Epson Salts (Powdered in Food Processer)
2 Cup Powdered sugar
2 oz Shea Butter
2 TBS Fragrance
Liquid Colorant
6 TBS Water
Cocoa Icing:
Ingredients:
2 TBS Meringue Powder
4 TBS Powdered sodium laurel sulfate (SLS)
½ Cup Corn Starch
½ Cup Powdered milk
½ Cocoa Powder
1 Epson Salts (Powdered in Food Processer)
2 Cup Powdered sugar
2 oz Shea Butter
2 TBS Fragrance
Liquid Colorant
6 TBS Water
Directions
1. Gather your ingredients to make the Whipped Icing
2. Weigh the Shea Butter and add it to your mixing bowl. Whip it for a minute or so. Add your powdered sugar and meringue powder. Whip on high for a few minutes.
3. If you haven’t done so yet. Grind up your Epson salts to a fine powder. Add the rest of the dry ingredients into your mixing bowl. Whip again for a minute.
4. Now we will weigh out our wet ingredients. Use your scale and place your paper cup on the scale. Tare the scale so it zero’s out Weigh out your fragrance oils, water. Make sure that your weights are exact on the oils and water. Add your colorant. I use about a ½ tsp of dye, but everyone’s colorant will be different. Make sure you right down how much you used to compare next time you make them. Stir all together to combine all ingredients well. Take a spoon and stir well.
5. Now turn on your mixer with the whipping blade attached. Mix on low speed; slowly drizzle the wet ingredients. You are going to mix this until it looks like whipped frosting. At this point you can add ½ tsp of water if you need to – to have it look like whipped butter cream icing.
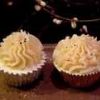
6. Now you are ready to ice your cupcakes. Insert your tip into your icing bag. Grab your bag and fill it with the icing. Make sure you turn down the bag so that you can fill from the nose of the icing bag. Once it the icing is filled twist the bag in your hand, as pictured in the picture.
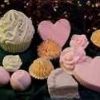
7. Squeeze the icing onto your cupcakes. Immediately decorate your cupcakes with sprinkles or anything to beautify them with. The recipe for the bath bombs, makes about 12 regular cupcakes and 35 mini ones. The icing makes enough for both. You use .7-.8 on the mini cupcakes and 2.3 on the regular ones.
8. Now decorate your cupcakes with sprinkles are leave them like they are.. perfect for the luxurious bath of all times. You only need 1-2 mini’s for a bath or one reg cupcake for a bath.
9. Let those dry 24 hours before shipping or using.


Recommended Comments
There are no comments to display.
Join the conversation
You can post now and register later. If you have an account, sign in now to post with your account.