

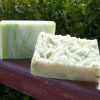
Marbled CP by AJ
Rating: beginner-intermediate
Supplies needed:
128 g. sodium hydroxide
12 oz. distilled water
1 lb. olive oil
½ lb. coconut oil
½ lb. palm oil or lard
2 TBL. Granulated white table sugar
1-2 oz. fo/eo of choice
liquid soap dye of choice (recommended) or powdered oxide/ultramarine of choice plus dab of glycerin.
Equipment needed:
Oven, oven timer, oven mitts, 2 lb. slab or log soap mold of choice (15x6x2” Rubbermaid drawer organizer is fine if you need a mold), oven-proof stainless or glass bowl (four quart capacity min.), stainless or wooden spoon, sturdy heat-resistant scraper-spatula, safety goggles, rubber gloves, scale, plastic lye pitcher, stick blender, fork, and small jewelry box (or similar sturdy square shape) plus waxed paper.
Process:
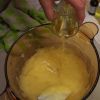
Step 1: Weigh out 12 oz. distilled water into plastic pitcher. Add 2 TBL. Granulated white table sugar to water and stir to dissolve. Put on goggles and weigh out 128 grams sodium hydroxide. Stir lye into sugar water, holding breath until out of room. Water may turn caramel color; this is normal.
Step 2: Gently melt ½ lb. coconut oil and ½ lb. palm oil (or lard) together. Put 1 lb. olive oil into the oven-proof 4-quart stainless or glass bowl. Add melted oils and blend.
Step 3: Preheat oven to 175* F.
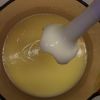
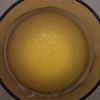
Step 4: Put on goggles again and carefully add warm lye water to warm oil mixture, stick blending to a medium-heavy trace. The thicker, the better.. Batter should be at least the consistency of pudding. Note that in this picture, you can see "trails" of soap batter that I drizzled on top. That's how thick it should be. The trails remain and don't sink back into the mass.
Step 4 (continued) ... see how thick the batter is? Lots of trails that don't sink back in. Kind of like thick pancake batter, or almost a pudding consistency. You should be able to stir without a lot of resistance, but it does coat your stick blender pretty well when you take it out. PLEASE NOTE that we are NOT adding scent or color at this time.
Once your soap is traced and in the oven, you can prepare your additives and mold.
Step 6: Measure out 1-2 oz. fo or eo of choice and set aside. I use 1 oz. for super strong fo's, 2 oz. for light ones. Just suit yourself, but anywhere from .5 - 1 oz. per pound of oils should be fine, taking care not to overdo the eo's that can be sensitive to skin.
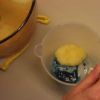
Step 7: If using powdered colorant, such as oxides, ultramarines, or clays, mix desired amount into a dab of glycerin in a glass or stainless cup. Smoosh the powder into the glycerin with a rubber spatula until all powder is dissolved. For this batch, I used 2 scoops of MMS Seafoam Green oxide for a pale green marbled effect.

Step 8: Prepare mold. (Line if necessary).
Step 9: After the 30 minutes in oven has elapsed, start checking on soap every 15 min. or so. We are watching for the entire batch to gel; the soap will go from opaque off-white (hard to stir) to transparent and gel-like (easy to stir). Gel goes from the outside to the inside, so even when it looks all gelled, check for a hidden lump of opaque soap batter in the center. If found, break up and stir in, returning bowl to oven for an additional 10-15 min.
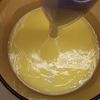
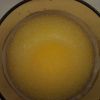
In this first photo, see the darker outer ring? It's translucent. That's the soap beginning to gel. It's started! It gels from the outside IN. If it looks like this photo, return to the oven and set the timer for another 10-15 min. to recheck it.
In this next photo, taken several minutes later, you can see the gel stage has progressed significantly.
Step 9 (continued):
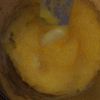
Now in this picture, it would appear that the entire batch has gotten darker and translucent, so we're all finished with gel, right?

WRONG! A quick digging session in the middle reveals a hidden mass of ungelled soap, right in the center! Break it up with your spatula or spoon, give the whole thing a good stir, and return to the oven for just a few more minutes until it's ALL gelled. Probably need no more than 5-10 minutes more of heat.
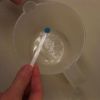
Step 10: Once the entire mass is gelled, take a small speck of soap from the oven (use rubber gloves – it’s hot!) into your hands and roll into small ball. Test for zap and test for lather. If it lathers and has no zap, it’s done cooking. If no lather and it does zap, return for more cooking. It won’t be long now until it’s done though, so check often! Every 10 min. or so. IF MIXTURE SEPARATES and develops some puddles, NO BIG DEAL. Just stir it back together when it comes out of the oven.

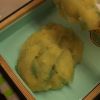
When the soap test is good -- no zap and you have lather -- your soap is done cooking. Remove from heat. It should look like this now:
From this step forward, you’ll need to work somewhat quickly. No dilly dallying, as the soap will become hard fast and you won’t be able to work with it very well.
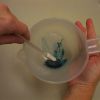
Step 11: When it’s all gelled and there’s no zap, remove from oven and thoroughly stir in fo / eo of your choice.
Step 12: Remove about 1 cup of soap batter to a glass or stainless cup/bowl. Add a drop or two of liquid dye, or add the powdered colorant/glycerin mixture to the cup of soap. Mix thoroughly.
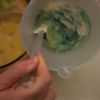
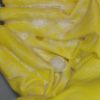
Step 13: Return colored soap portion to main batter, gently folding colored portion in. Do not over stir; leave some portions of the main batter uncolored to achieve a marbled effect.
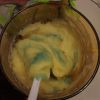
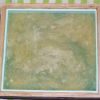
Step 14: Pour/glop soap into mold. I find it helpful to use a sturdy heat-resistant spatula to scrape.
Step 15: Bang the soap mold on the countertop or floor. Keep banging several times until the mixture is somewhat evenly spread. I drop mine several times from a couple feet high -- onto a bare concrete floor. It should now look something like this.
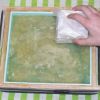
Step 16: Smooth top with small block or box covered with waxed paper. Press gently to evenly distribute the soap batter so you won't have some bars too thick and some too thin. This smooth’s out the tops some too.
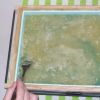
Step 17: Give it an interesting, rough texture with the fork or other tool, if desired.
Step 18: When completely cool, cut into bars and set on curing racks in cool, dry place until soap is no longer soft. Can be used immediately, but will last longer if you let some of the water dry out so it gets harder.

QUESTION: Can any soap recipe be used?
Answer: Yes.
Question: If I have a very finicky FO for CP can I use it for HP?
Answer: Yes.
QUESTION: Why the sugar?
Answer: It helps the batter be smoother/more fluid when it's time to mold.
QUESTION: What about discoloration?
Answer: discoloration in HP is different than discoloration in CP. HP, in my experience, discolors much more slowly. And it's more spotty. Some fo's that discolor one way in CP discolor differently in HP. You just have to try and see what happens.
QUESTION: Can I water discount?
Answer: You never want to discount the water (liquid) when you are hot processing. I'm not sure if I've ever seen a "technical" explanation for this, but that's what I've always read. When you cure CP soap, mostly it's for evaporation (after the saponification, of course) of the water. If you use a 33% lye solution, and such, less water, you have less water to cure out. When you are HPing, you are cooking the water out, so you don't want to start with less to begin with.


Recommended Comments
There are no comments to display.
Join the conversation
You can post now and register later. If you have an account, sign in now to post with your account.