

Shaving soap
Rating: Beginner to intermediate
Ingredients:
Palm Kernel Oil 30%
Olive Oil 18%
Coconut Oil 15%
Canola Oil 13%
Rice Bran Oil 9.5%
Cocoa Butter 5.5%
Shea Butter 5.25%
Castor Oil 3.75%
Distilled water (FULL WATER) per lye calculator
Sodium Hydroxide per lye calculator
Pinch of silk for the lye water (optional)
Clay .3 oz per pound of oils. I use either bentonite or kaolin clay. Bentonite gives a gray cast to soap, where kaolin is white.
Non-accelerating FO…..this is important as the clay will accelerate trace for you!
colorant - optional
Tools: Mold of choice plus freezer paper to line it if needed, basic safety equipment for soaping, pitcher or similar vessel to mix lye in, stainless steel or dedicated wooden spoon for mixing lye, soaping pan or bucket, scale, stick blender, wire whisk, small cup or vessel to add color if desired, oven, method of cutting soap (knife, tank, machete, etc).
Instructions (pre prep):
Mix lye the day before making.
The day of making, weigh out and melt oils and allow them to come to room temperature. You do not want to soap with warm oils at all. The clay used will speed things along.
We’ll start by making our lye solution and setting it aside to cool off overnight.
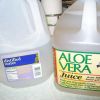
At the last moment, I found some aloe juice that I need to use up, so I have used ½ distilled water and ½ aloe juice. Normally, I use all water. Don’t fret if you don’t have aloe juice! This has become my “test” batch of sorts.
Completely optional, but I am adding a healthy pinch of silk to the water/juice.
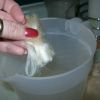
Next, Don your safety gear, glove, safety glasses, apron and long sleeves, etc and measure out your lye.
Now, I’ve moved to my stove top under the vent hood, that is on full blast, to mix my lye into my water/juice/silk. Mix your lye where ever you do it, garage, outside, etc. Pour slowly and mix well. Allow to cool to room temperature. (I put the lid on it and left it overnight!)
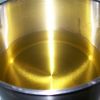
Next we want to weigh out all our oils and melt them together. Normally I would do the hard oils in the microwave, but I got lazy and just chucked the whole pot on the stove.
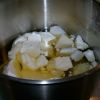
And here they are all melted and clear….
At this point, the oils were left overnight along with the lye. That’s all we needed to do.
INSTRUCtions DAY OF:
Let’s begin by retrieving the lye solution and oils we mixed together last night. Check your oils, they may have set up a bit and gotten cloudy. If so, they need a zap of heat to return to clear…but not really enough to heat them back up! Mine were cloudy and I had to reheat for a few minutes to reincorporate.
While the pot is cooling back down, I’ve gone and prepped the rest of my area.
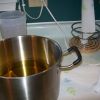
Here I have my oils, the pitcher with the lye solution and my stick blender, ready and waiting.
Around the corner, I have slab mold all lined and ready to go. Also, a Milky Way hockey puck mold. I’m intentionally making more than my mold will hold so that I can make DH some round shaving soaps. They fit better in his shaving mug and I’m feeling nice today.
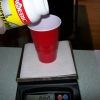
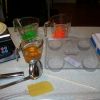
Now, I don’t normally color my shaving soap, but today I am using neon green and neon orange, because I can. I’ve already got them mixed up with a bit of glycerin and ready to go. I’ve got my FO measured out and my bentonite clay (paper plate on the scale). In front we have my weapons of choice. A stainless steel whisk to whisk in the clay, a ladle to get some soap out to color, a spatula just in case, and a bamboo skewer to attempt swirls with.
The iPod Nano is fully charged and tucked into the pocket of my apron, ready to go.
It'll take a few minutes to get my oils back to room temperature yet.
Now, I know that the FO I am using, Old Mill’s (Tony’s) Vervaine Olive Leaf, doesn’t accelerate much. You do not want to use an accelerating FO if you can avoid it. Once the clay goes in, things will move along swiftly. Be prepared. That is normally why I don’t color my shaving soap. LOL.
So, let’s add the FO, shall we?
Now, give that a stir a bit and get the FO mixed in.
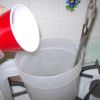
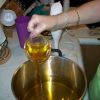
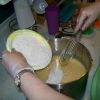
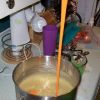
Grab that lye pitcher and slowly add it to your oils while stirring with the SB. (Pix 10)
Things will move quickly from here on out...so be prepared!!
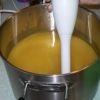
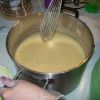
Once you got all the lye solution in, do a combo of stick blending and stirring to get it all nice and emulsified.
Mine did NOT want to emulsify for me.
Still blending…….about 4-5 minutes now
Finally! Light trace!
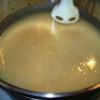
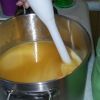
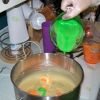
When your oils and lye are emulsified, and you are barely at light trace, it’s time to add your clay. I sprinkle mine in and whip it in with a wire whisk. I’m sure you could stick blend it in if you wanted to, I just never have.
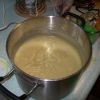
And here things started going fast!
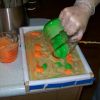
If you are coloring some, now’s the time to quickly pull some off to color.
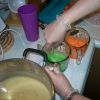
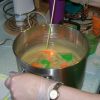
In less than the minute it took me to stir the two colors up, the main batch has gone to medium/thick trace. UGH.
For an ITP swirl, pour high and try and get the colors to the bottom of the pot.
By the time I got to green, it was chunky! NICE!
One stir with the bamboo skewer and to the mold we go running!
It’s uber thick now. The colors didn’t go even half way into the pot. DH was behind me with the spatula slooping it out of the pot….and he was playing photographer!
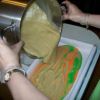
The colors are really thick now and I’m just glopping them on the top and hoping for a decent swirl.
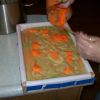
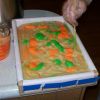
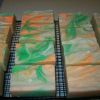
Here it is all molded and finished!

I did not insulate this at all. 4 hours later I checked and it started to gel, so I put it into an unheated oven to finish the gel.
The clay will cause you to want to cut it sooner than regular CP. I normally cut about 15-18 hours after pouring and it’s pretty firm. I had DH cut the soap for me at about 16 hours and it was very firm.
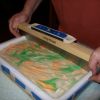
And here it is all cut, but not beveled yet. Now just to cure for 6 weeks before use!


Recommended Comments
There are no comments to display.
Join the conversation
You can post now and register later. If you have an account, sign in now to post with your account.