

Lotion making 101
Rating: Beginner
Ingredients:
Note this is a base recipe taken of the recipe section of this board
water phase:
23 oz distilled water
.6 oz glycerin
Oil Phase:
.6 oz of stearic
1.4 oz ewax
5.6 oz liquid oils (olive, jojoba, rice bran oil, sweet almond, Apricot Kernel, avocado, any mixture you would like. For this class I will be using 1 oz avocado, 2 oz jojoba, and 2.4 oz apricot Kernel oil, with .2 oz vitamin E)
Preservative phase:
.4 oz preservative (using at 1% - I will use phenonip) I DO NOT recommend making emulsified lotion without a preservative and will not entertain the idea during my class so please don't go there...If you feel strongly about not using a preservative don't - keep it in the fridge and use it quick! - but please don't bring it up during the class, cause it's a hot button issue that may detract from the class. Again, I will not respond to questions about how to make lotion without using a preservative during the class.
.4 oz FO if desired (using at 1%)
Gallon Ziploc freezer bag (to fill bottles)
Bottles (and lids) to fill with lotion - this should yield about 28-30 fluid oz depending on evaporation and the type of oils used
Tools for class:
Digital scale accurate to one tenth of an ounce
Double boiler - enough to hold water phase.
Thermometer
Microwave safe container for heating oils phase in
Small containers for weighing preservative and FO
Mixer (can use stick blender - I use my KitchenAid)
Freezer or ice water bath
Spatula for scraping bowls
Wax paper (for placing spatula on or other items to keep sanitary)
disposable gloves if desired (because I sell lotion I use non latex gloves because of allergens)
Twist tie, string or clip to tie off your baggie to fill bottles.
PREPARATION BEFORE CLASS:
Please know the proper usage rates and directions of your Preservative. You can read a thread on preservative use at http://www.craftserver.com/forums/sh...d.php?p=199218
I am only familiar with phenonip and how to use it, so this area is up to you to figure out.
CLEAN AND SANITIZE EVERYTHING!!!! I completely clean and sanitize my sink (including the faucet and handles), boil my KitchenAid whisk, use a sanitizing solution to wipe down my mixer, counters, microwave, freezer handles stove and my bowls and other tools. Anything I will touch or use is sanitized as best I can. I do not sanitize my lotion bottles as getting the liquid out is too hard and more liquid would mean my preservative would be diluted.
Water Phase:
Weigh the water and glycerin in the top of a double boiler. Put on top of water pot and bring to a boil on high. If possible attach a thermometer to the side of the pot (be sure it does not touch the bottom of the pot)
when the liquids reach 170 reduce heat to low-medium and hold at 170 for 20 minutes (if the temp gets over 170 for a bit that is ok) you can cover this with a lid if you don’t have a thermometer that is attached, but do check it every 5 minutes or so to see the temp is ok.
If you will be adding water to account for evaporation have a seperate pot of distilled water boiling.
I use a digital thermometer that clips to the side of the pot like the one from Pampered Chef for my heat and hold with water and a regular thermometer for oils.
Next step:
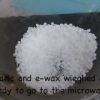
While the water phase is heat and holding weigh out all your ingredients. Put the stearic and e-wax in the glass measure for microwaving but don’t microwave it yet.
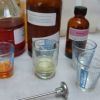
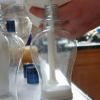
Measure out the vitamin E, preservative (divide in half if using phenonip), and FO in small containers. I place them in front of the bottles so I know what is what like this:
You can measure out the liquid oils now too if you like, but I usually add straight to the stearic and e wax have after they have melted making good use of my tare button and pouring slowly for accuracy.
By now the water phase should have heated about 8-10 minutes. Now we will put the stearic and e wax in the microwave on high for about 5 minutes. The container will be very hot so use a clean towel or potholder to get it out. Now add all the liquid oils (but NOT the vitamin e – that will go in with the preservative).
Heat in the microwave on high for about 2.5 minutes. We want the oils to reach 170 degrees. You may have to cook longer or shorter depending on your microwave.
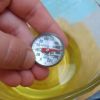
After the oils have reached 170 cool to the desired temp your preservative recommends. Phenonip is between 140-158 degrees F. You can accelerate cooling with a freezer, fridge or ice bath, but be sure not to get too cool.
At this point the water phase should be done heating too and you will want the water to cool to the proper temp at the same time the oils are cooling.
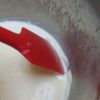
Sometimes I get my oils melted too soon before the water is done and the oils are cooling too quickly. I will take my glass measuring cup with the oils in it and place it over the hot water from the double boiler to keep it from getting too cool too fast like this:
****Now is the time to add more water to the water phase to account for evaporation if desired. Do this by weighing the liquid phase in your mixing bowl and adding boiling water to reach 23.6 oz.****
If you are using phenonip add the other half to the water phase when it reaches 140-158 degrees F
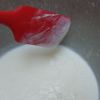
When oils and water have reached the proper temp and you have added your preservative per your manufacturer’s directions, add the vitamin E. mix with spatula to be sure it is combined. My very favorite spatulas for lotion making are ONE piece silicone spatulas like this one made by good cook:
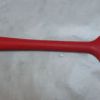
I worry the two piece kind will grow stuff in the crevices. I soak everything I can in a sanitizing solution before making lotion and before I had these I had 2 piece spatulas that came apart – I would take them apart and soak them that way. Of course the silicone can get cuts in it I suppose, but I still think it is a safer bet.
Before combining the oils and water you want them to be as close in temp as possible. I try to have mine no more than 10 degrees apart. This is supposed to help prevent separation.
Now combine the oils and water in whatever container you will be mixing in. I will be using a KitchenAid with the whisk attachment.

I think my KitchenAid whips more air in the lotion than I like, but I like that I can boil the whisk attachment. My plastic stick blender didn’t whip as much air, but it also had all sorts of crevices bacteria could hide…It’s ok to tell me I’m anal!!!
Mix for about 2 minutes on high. You can mix for a longer time period right now without too many air bubbles since it is still really thin, this also helps it too cool down a bit too.
Now put it in the freezer for about 10-15 minutes and check back. If you have a bowl that is wider in diameter than a KitchenAid bowl the lotion will cool much faster. You will need to check it more often. The guidelines I am giving here are based on the KitchenAid bowl
Ice bath alternative – you may wish to have your mixing bowl in an ice bath to cool down. My experience is that this takes longer and I hate the hassle of an ice bath too, but you can do it if you like.
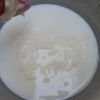
By now there will be a ring around the sides and top of the bowl of thicker lotion.
Use your scraper to pull the ring into the center scraping the sides and bottom.
Put the bowl on the mixer for 30 seconds to combine it all again. I try really hard to mix only as much as I have to at this point to avoid adding as little air as possible.
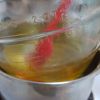
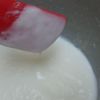
Put in the freezer for 10 minutes. Take out and scrape sides and bottom of bowl mix for 30 seconds. Now it will be a “thin Trace” (for those of us who make soap!) like this:
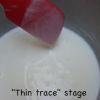
You will repeat these steps about 2-3 more times (scraping and mixing between each freezer session) depending on how hot things were to begin with and the depth of the bowl. This is what things look like as it thickens every 10 minutes or so (after mixing)
Thicker
Thicker yet
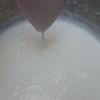
When there are fairly thick streams of lotion visible on the top when you drizzle and it is room temp or so it is ready to add the FO
ADD your FO and mix for 30 seconds, just until well blended – we don’t want to add a bunch of air in there!
WOOHOO! You made lotion! NOW we have the challenge of filling the bottles!
Put your gallon Ziploc bag in a bowl (one that goes maybe half way up the height of the bag). This will help keep your bag from rolling over as you fill it. Fill the bag with your lotion, take bag out of the bowl and place on counter, carefully fold it over to get out the air and seal. Now get all the lotion into one corner as best you can and tie it off with a twist tie, string or a clip. It should look like this:
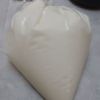
Make sure your lids are off the lotion jars and the jars are lined up and ready fill and then cut the corner off the bag. Pipe the lotion into the jars.
This will still seem SOOO runny, but it’s far easier to fill with runnier lotion than not and it will thicken up a bit by tomorrow. You may want to gently tap the bottles on the counter to get any air out as you fill.
With a clean paper towel sprayed with a bit of rubbing alcohol wipe the bottle openings of any over poured lotion (if you are like me you may have to get some off the bottles too!) Put lids on. If your lotion still feels a bit warm leave the lids off for 30-60 minutes to prevent condensation. Label. I filled 10 and ¾ 3.3 oz jars with this lotion (I did add the 3 oz of water I was missing) I know I probably end up with some air whipped in there from using my kitchen aid!!!

Additional info:
When boiling it on direct heat that took out so much water, so next time add what you lost - make sure the water was boiling. If you ever get into adding more stuff to your water phase (like milk - at less than 10% of the total recipe weight!) you will want a double boiler.
As for formulating your own recipe...You can start by playing around with different oils for your liquid oils. Then if you want a thicker cream take your water as low as 45-50% and maybe add butters for the balance. 70-75% water for lotions.
This recipe has these percentages:
water 73%
glycerin 2%
Stearic 2%
Ewax 4%
liquid oils - 17%
preservative 1 %
FO - 1 %
I would keep the preservative and FO at 1% each unless your preservative mfr says otherwise.
Stearic can be taken up or down a percent or two (sub with oils) I usually don't mess with e-wax too much. You can sub out some of the liquid oils for butters too if you want, but you will end up with a thicker product depending on how much you sub out.
Question: When melting the e-wax and stearic on the stove, I want those to reach 170, but how long will I want them at that temp?
Answer: Your oils do not have to hold for any length of time at 170. They just need to get there. The stearic and e wax just need to be melted then get the combined oils to 170 and take them off heat.
Question: I'd like to leave some of the lotion unscented, how do you add FO after the face? Do you have to warm the lotion or anything or just mix it in to the unscented product?
Answer: Just weigh out the lotion amount you are going to use, add the FO (most FO's can be used at 1 %) and mix it up well. If I'm mixing just a small amount I do it with a whisk.
-
 1
1


Recommended Comments
There are no comments to display.
Join the conversation
You can post now and register later. If you have an account, sign in now to post with your account.